Tuesday, March 24, 2020

Hoping this Helps:

How To Make A Hospital Mask:


First, I want to say that these are NOT surgical grade masks. They are meant to be used when nothing else is available and you are left using a bandana. They may be used alone or over an N95 mask you might be forced to re-use. It is a last resort as something is better than nothing. That said, let's begin:

I got my instructions from a link my friend, Paula, suggested and watched this video. 

And...
(There are other patterns on her site, too.)

Then, I added a little pocket and a twister tie so you can pinch the top of the mask over the bridge of your nose. 

Let's Get Started:

I gathered up fabric (100% cotton is best), 1/4" elastic, & twister ties.

Cut rectangles of fabric 9"X7" for adults (children size = 7"X5").

Cut 2 pieces of elastic 7" long for each mask.

Cut a twister tie pocket 1/2" longer than your twister tie and 3/4" wide.

I centered the twister tie pocket on the wrong side of one of the 9" edges of the rectangle and stitched 3 of the pocket edges leaving the bottom edge open. Backstitch all of your sewing.

Tuck in a twister tie and pin the opening closed.

Flip it over to the right side and attach one elastic piece on the 7" edge of the rectangle, about 1/2" down from the 9" edge. Do the same on the other 7" side. 


Now, pin the loose ends of the elastic 1/2" from the bottom on each side.

Repeat on the other side.

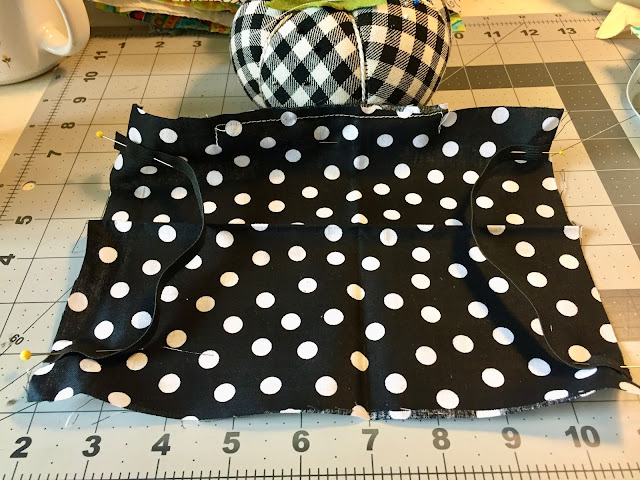
Place the 2nd rectangle over the first one with right sides together and elastic bands inside. Pin and stitch leaving a 3" opening at the bottom for turning. Be sure to use catch the twister tie pocket while stitching so you enclose the twister tie inside the small pocket. See both photos below before stitching.

(The 2nd rectangle is peeking out from under the dotted one.
It it a white fabric with a black design so this mask will be reversible.)


Now, clip corners close to stitching and turn right sides out. 


Iron flat. Then, fold in half (hot dog style) and iron a crease. Open and fold both long ends in (hot dog style again) to the center crease. Photos of this on on the Sweet Red Poppy web site. CLICK HERE.

Fold, pin, and iron 3 pleats towards the top (where the twister tie is), and stitch in place. Continue stitching along the bottom edge which will close the 3" opening. 

Here, you ca see how the twister tie allows the fabric to bend and stay in place over your nose.
I made 18 of these today. I plan to make more tomorrow. 


I made lots of happy, colorful ones, but now I'm making lots of the more popular plain ones. 

Hospitals will wash these. I washed mine with Tide Free & Gentle (which is not free and not particularly gentle, but it's fragrance free) and they did fine in a dryer on the low (delicate) setting. Since they are cotton, an iron helps, but I kept it off of the area by the plastic-coated twister tie. 

Do check with your local health care providers as not all are accepting these. For those of you who live near me, our local hospital is requesting a different pattern which I plan to work on tomorrow. Thanks to my friend, Kathy, for sharing this link with me: CLICK HERE for another pattern.

Thank you for helping your friends, community, and fellow humans. We are all in this together! Stay strong. We can do this!  


Wednesday, March 18, 2020

Home Schooling Individualized for your child & it's FREE! + more

FREE for Parents To Use At Home:

Are you wondering where to begin when teaching your children at home? ESGI has your answers and it's FREE!  CLICK HERE for the free link.
Directions to get started FREE are at the end of this post.
Whether or not your child's teacher uses ESGI, you can use it for FREE with your child! 
(Directions on how to get started with ESGI for FREE are at the end of this post.)

Creative Ways To Use Flashcards:

Yes, I HATE flashcards. Life should NOT always be a test! But, if you use them as "skill cards" they can change everything:

Here is how to use flashcards in FUN ways:

1. Print your child's flashcards from ESGI.
(Directions about how to use ESGI for FREE are at the end of this post.)

2. Choose a few "skill cards" (let's not call them flashcards any longer) and have your child cut them out. (Use fancy scissors to make it more fun and to build fine motor skills as they are usually a little trickier to use.)
Have them cut around the
 "perimeter"
1st (a great word to discuss)
and keep the scraps.

                 Use the scraps for an art project!


3. Place 2 skill cards, back-to-back, inside a sandwich size zipper bag. 

4. Remove the air from some of the bags and seal.

5. Add air, by inserting a straw and blowing air into the bag, to some of the bags and seal.

6. Now, let's play! In the bathtub, or even in a sink, play "Sink That Skill!" Let the bags with air in them float as your child scans all of the bags for the skill you call out. "Sink the letter Q." "Sink the letter P."
Imagine the tub filled with floating bags of skill cards!
Click on the video:

And use the bags without air to stick skills to the tile. And don't forget to talk about sinking and floating to get a bit of science in too! :)


What Else Can I Do With These Skill Cards?

~Stick individual cards to your child's bedroom door or at the bottom of the stairs and have them slap the skill card and say the letter, #, sight word, etc. as they pass by.
~Hide a skill card under each dinner plate at the dinner table tonight and each person gets to look at their skill card and give clues to the family to help them guess the letter, #, sight word, etc.
~Copy a 2nd set of skill cards, cut them out and attach them, face down, to the refrigerator with magnets. Let your child play the Memory Game as they peek at skill cards and try to match them up.
~Use skill cards as "brag tags" and let your child tape the cards that have the skills they have mastered onto their shirt and wear the brag tags all day long. 

Whatever you do, make learning FUN and don't forget to return to ESGI to re-test your child's skills. They will be overjoyed to see the results as their pie graph turns green and, once they see this, they will actually beg you to test them! Really, they will! :)
So, what are you waiting for? Get started with ESGI for FREE! Here is how...

Getting Started With FREE ESGI:

If your child's teacher doesn't already use ESGI, NO PROBLEM! You can get a FREE account and use it at home.   Just CLICK HERE.
Then, just choose a few tests to run, such as letter names or sounds, number recognition, etc.
After you have tested your child you will have all of the information you need to work on the skills your child has not mastered yet. 
CLICK HERE to get started free.
If your child's teacher already uses ESGI, your child must have an amazing teacher! Just ask him or her for the link to your child's testing data. Then, you'll be all ready to print and play! 
CLICK HERE to get started 
until you get that link or password from your child's teacher.
The FREE LINK is good until July 3.

If you have ANY questions, just ask in by leaving a comment below and enjoy spending time with your child. You've got this, Mom & Dad! :)